Couching
|
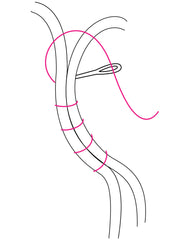
Metal threads with a core of cotton such as Japanese thread and twist are usually couched down in pairs, though they may be used singly on occasion. If you are stitching a fairly short line, estimate the length of metal thread you will need and cut to size. If you are stitching a very long line or filling a shape it may be easier to bring two lengths together and cut to size later. Use a single waxed machine thread for the stitching. Begin at one end of a line or shape. Make a small stitch catching the metal thread about 5cm (2 “) from its end and make sure that the two lengths lie comfortably together, both flat against the fabric. Make another stitch about 4mm (1/8”) along the line. The stitch should be at right angles to the metal thread, and large enough to allow both lengths to sit on the fabric neatly without twisting, but small enough to prevent them from moving around. Repeat this all the way along the line, making a stitch every 4mm (1/8”). At the end, make a double stitch to secure it and cast off the thread. If you are filling a shape, the next row should run parallel with the first, with each stitch on this row sitting between two on the first row to create a brick pattern.
Now you will need to plunge the metal threads through to the back. It is important to plunge one length at a time. First, use the large sharp needle to make a hole in the fabric. Then thread the very tip of one length of metal thread into the large needle and take it through the hole. It will be quite stiff, so give it a short sharp tug. Repeat this for each length of metal thread. Then, turn to the back and use a double length of waxed sewing thread to bind the metal threads to the fabric in pairs or fours. Bend the lengths of metal thread back on themselves. Scoop the needle into the fabric and then take the stitch over the metal threads before scooping into the fabric again. A few small stitches should suffice, about 10mm (3/8”). |
|